Showing posts with label beauty. Show all posts

Wednesday, 7 January 2015

2 Lush bath bomb reviews!

Happy New Year!! I hope everyone enjoyed themselves seeing in the new year, I sure did. 

For Christmas this year I got two bath bombs from Lush and as we all know they are fab but very pricey so I was glad I got two that I had never used before to try out. 

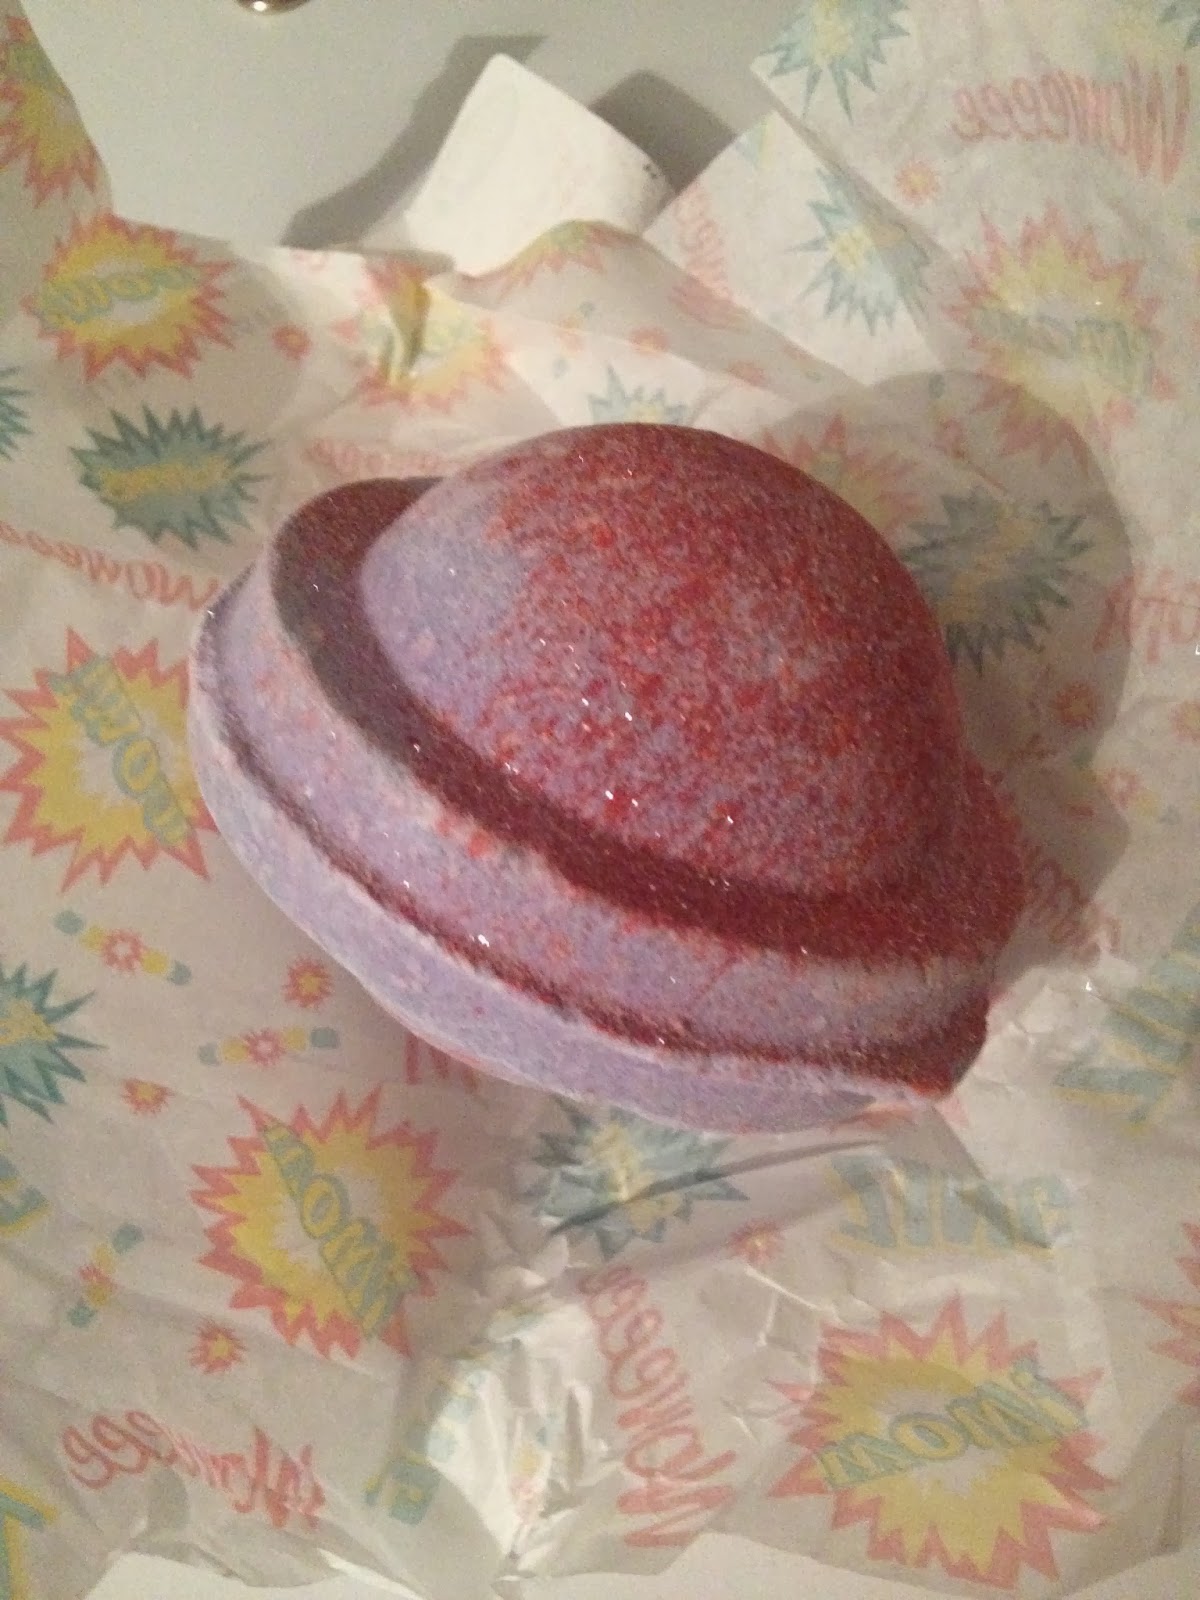
The first one was called Northern Lights and I would have to say out of all of the bath bombs I have used this one was the prettiest. It changed colours and fizzed around the bath and after it had all dissolved (after about 10 minutes) my bath water was purple. One of my favourite colours. It also smelt lush (see what I did there?)
I recommend this one to all the bath lovers out there.


Unfortunately it is not on the website anymore as it was recently in the sale, but go down to your nearest Lush shop and they might still have it there!

The next bath bomb I got for Christmas came part of a gift box set. I'm not sure of the name of this one as I was too excited to use it and threw the box away. I've tried to look it up on their website and they don't seem to sell this one individually and the set I got is no longer available online. This bath bomb made my skin feel really soft and it smelt so good. The only downside to this one is that right in the centre (when you get to that point) its full of glitter so you and your bath water become covered in sliver glitter. If thats your sort of thing then this ones a good'en. 


I also hit the Boxing Day sales and picked up a couple of Yankee candles that were reduced. These candles go hand in hand with bath time. I would recommend investing in one. My two current favourites are Toasted Marshmallow and Strawberry Buttercream. So good you can almost eat them. 

Do you have any bath bomb recommendations?


Tuesday, 5 August 2014

LOREAL Sublime Bronze self-tanning elixir review

Hey guys this post is a review on the new Loreal Paris self-tanning elixir. 
I brought this product as it looked interesting and was on offer in boots. Even though it is summer I just don't have the patience to sit outside and tan so faking it is always a must for me. Once I purchased it I decided to look up its reviews. They were all bad. Thankfully I did look up the reviews otherwise my body would be in a right state right now. In the end I only decided to try it out on my legs.


Applying
So I had a shower before applying, I shaved my legs and exfoliated. Once out of the shower and my legs had dried off completely I used a tanning mitt to apply the product to both of my legs. So far so good. It states to have no self-tan smell and it was half right. The smell isn't as pigmented as actual self tan products but there was still a hint of the fake tan smell. The product also states that it dries quickly and I would have to agree as it only took 2-3 minutes before I got dressed (although I still would advise wearing dark colours I'm not sure how white would cope with this, don't risk it!). Another bonus was that it made my skin really soft.

Day 1
So I've had the product on my legs now for a couple of hours and I can smell a hint of fake tan although it was bearable (I hate the smell of fake tan). As the tan developed and the hours went by the smell got much worse and it was starting to annoy me. 

Day 2
I woke up this morning with horrible streaks on my legs and it had gathered all around my ankles which is not a pretty sight. The smell is even worse now. The product states that you have to apply it for 3 consecutive days for a 2 week tan. After looking at my legs this morning I don't think I'll be applying the next layer anytime soon. Time for a shower to try and scrub this patchy tan off.

Product rating: 1/10

Sorry Loreal it just doesn't do what it says on the tin.


Sunday, 22 June 2014

TIP - for hair that is constantly knotty

If you have extremely knotty hair, like me and if you're one of those people who spend hours and hours brushing and 2 minutes later its one giant fur ball again, like me. Well I suggest buying the LO'real de-tangler spray. 

Yes I know... it is for kids. But it works! 
Obviously it doesn't prevent your hair from getting all tangled up but it helps speed up the brushing process.

I tend to only really brush my hair before I wash it anyway so this product is perfect. It does have a strong fruity smell to it, which I personally don't want my hair to smell like which is why I only use it before showering.

It is really cheap in boots too and it lasts ages! 


Do you have any tips?


Tuesday, 17 June 2014

Current favourite lipsticks

I have come to understand that I have a slight obsession with lipsticks and seeing that I have a few that I adore I thought I would share them with you!

First there is my newest addition to the collection, Mac's matte lipstick in Chilli. My friend had this exact lipstick and I borrowed it all the time so I finally decided to buy my own! It is easily applied and lasts for a good few hours before you need to reapply. It also tastes and smells so good which is a bonus. It costs 15 pound and you can get it from your nearest mac store and in some department stores such as Fenwick. 


The next lipstick is by No7 and I got it in the sale in boots. I think i cost me about £1.50 but I can't remember. It is perfect for everyday wear as it is very subtle and lasts a long time. Its in the shade Glamour. I must add that this colour does not come out as pigmented as it looks.


This lipstick I bought myself when I was in Germany in one of their drugstores. It only cost me about 2 euro and I've never looked back. It is by the make p2 and shade Copacabana (059). This colour I feel is the best for the summer as its bright and very on trend right now.


The last lipstick I am going to tell you about is the Rimmel London 01 in the Kate Moss collection. The pigment of the red in this lipstick is greater than that of the Mac lipstick. This colour is one I would wear on a night out. Very vampire chic.


I highly recommend all of these lipsticks as they are all amazing yet all different.

If you're like me and you're not a fan of any lipstick that isn't matte then heres a tip... After applying your desired colour of lipstick, dap some tissue paper over the top gently to lift the shine. If this isn't enough then dust some matte powder over the top of your lips. This should do the trick. Now your once high-shine lipstick is now lovely and matte. 


Sunday, 9 February 2014

Smokey eye tutorial!

Hey guys, a beauty post for you today! 

I have entered the eye makeup competition run by Next Route Style and I thought I would share with you the look that I entered into the runnings. 
So basically I chose the classic dark smokey eye look that I tend to do for the majority of the nights out I have while at uni. 
For this look you will need: 

  • Any sort of eye shadow palette that includes dark browns, light browns, blacks, and maybe even a colour for highlighting. I used the Naked 2 palette. 
  • Black eyeliner, I used Collection Extreme black felt tip liner.
  • Mascara, I used Collection No Clumps mascara.
  • Fake eyelashes (optional).
  • Some tape, either masking tape or Sellotape.
To start of this look you will need to take a piece of tape and place it on the back of your hand and take it off. Repeat this step a few times so that the tape loses its sticking power! This step is important as you don't want to apply it straight to your face as once its ready to be removed it will pull off the makeup (foundation, primer, etc.) that you have already put on your skin. Very time consuming and annoying to correct! Once you have done this, apply the piece of tape under the eye towards the hairline (pictured). The point of using tape is to allow for an accurate cat eye look and to catch any falling pieces of shadow. Once you have aligned the tape to your satisfaction you can start!


I started off by applying a light brown (a few shades darker than my skin tone) to my lid and along the (cat eye) wing. This will be the base.


The next few steps are all about layering. Start off with the lighter browns and layer the shadow onto the lash line, crease and winged corner of the eyelid. Repeat this step a few more times but with darker browns and then finally end with a black. It is important to use little shadow and lots of layers as you do not want to apply too much as its difficult to correct. Better to be safe than sorry. Don't want to end up looking like you have two black eyes. Not a good look!

Now its time to carefully peel off the tape and you will (hopefully) see a nice straight line.

Next is the eyeliner, lashes and mascara. For the liner, draw on your top lash line and along the winged eyeshadow to create a cat eye look. Apply the lashes as stated on the packet and apply a small amount of mascara to the bottom lashes to even it out. 

Highlight the brow bone and the inner corner of your eyes and you're good to go!


Not to forget, if you enjoyed this look then please go onto the Next Route Style blog and vote for me to win please! All you have to do is comment "Sophie Robinson" on their post, CLICK HERE to do just that!

Note: Ends Sunday 16th Feb

UPDATE: I made the cut thanks a lot guys! Unfortunately didn't win but hey ho!

Monday, 13 January 2014

NAKED 2 PALETTE REVIEW + SMOKEY EYE HOW TO

So out of my Christmas money I thought I would treat myself to the Naked 2 palette. I thought that the colours in this specific one would suit my skin colour much more than the other two and I also have a thing for wearing dark-ish eyeshadow everyday. 


Review
I love every single one of the shades and they all glide on very easily and (with a makeup setter) stay on pretty much all day/night!
In this palette, my favourite shades are Tease, Snakebite, Bootycall, and Blackout! The Blackout shade is very pigmented and only a small amount is needed to achieve a perfect smokey eye! This also means it will last a long time meaning it's worth the 38 pound I spent!
So after using this palette for a few times, and even having someone compliment me on my makeup one evening, I highly recommend this palette and if you are even considering investing I say stop what you're doing and go buy it!


Basic/everyday smokey eye tutorial
To achieve a simple smokey eye look that I use on a daily base with this palette, first apply a layer of the shade Tease to your whole lid. The next step is to gradually add the Busted shade to the outer lid and crease line, this will give a good base for the darker colours to be applied to! Next use Snakebite and apply it to the area you just applied the previous shade to. Depending on how dark you like the whole look to be you can either apply Blackout to this area as well (ever so lightly) or continue to the next step. To finish off you can apply winged eyeliner to the lash line and the shade Bootycall to your brow bone for a bit of highlighting.


Friday, 3 January 2014

LUSH Space Girl bath bomb review!

So after Christmas was over and done with I went up to London for the day to do some shopping. I really wanted to go to a lush shop and try one of their famous bath bombs as I thought they looked so good after seeing one on +Zoellas YouTube. 
I picked up this one called Space Girl for just over 2 pounds and I loved it! The smell was so vibrant and the colour was a lovely pinky-purple. As you can see it is also covered in glitter which caused the bath water to glisten in the light! I thought that when I got out I would also be covered in glitter but I wasn't noticeably covered which I liked. I'm pretty sure that if you used this bath bomb and didn't use as much water as I did you probably would come out sparkling. I highly recommend this product! It's also a great present for someone!


Tuesday, 8 October 2013

Quick 'bad skin day' fix

The best thing I have picked up over the years of being a teenage girl with occasional break outs is SUDOCREAM!! It works wonders. If you're having a "I can't leave the house looking like this" day or even sometimes week, then apply a layer of sudocream onto your face or problem areas. Sometimes I sleep with it on if I have no time during the day. It relieves redness and dryness all while helping clear your skin. I strongly advise it! 
Another tip! If you have no time to apply a sudacream face pack then before applying concealer and foundation apply a small amount of green eyeshadow onto the red areas and/or spots. This helps hid the redness! No one will ever know!


Monday, 7 October 2013

Nail art for short nails

If I paint my nails when they are this length I feel like it highlights the fact that they are short, so I have come up with a nail art idea which prevents them from looking stumpy.

To start you should paint you nails with a base coat of some sort. I usually use a nail strengthener and a base coat but it really depends on your own preference. Then I used a nail art brush, which I got off eBay cheaply along with a red revlon nail polish (shade 620 bewitching). It is better to practice before you apply the base coat to avoid mistakes when painting on the hearts. What I did was draw a "V" and soften and round the points.

The finished look: